
December 2020 Eclipse Festival of Frequency Measurement
Alternate Language Options:
Spanish: Español
Portuguese: Portugués
Calling all stations: Join us for
The December 2020 Eclipse Festival of Frequency Measurement
Introduction
Contact information:
Kristina Collins: kd8oxt@case.edu
Research Questions
- How do the propagation paths of shortwave time standard stations vary over a calendar day?
- What properties of the ionosphere are we able to measure by observing the variation in these HF propagation paths?
- What effect will the eclipse have on these propagation paths?
- How do various measurement techniques for understanding the path variation compare?
- Is there volunteer interest in collecting data in the regions near totality for this eclipse?
Objectives
- Promote international goodwill by working with citizen scientists around the globe
- Measure Doppler shifts caused by space weather's effects on the ionosphere.
- Use a specified measurement protocol available to amateur radio operators and other citizen-scientists.
Times
- Practice Runs: 21 November 2020, 0000 – 2359 UTC, 5 December 2020, 0000 – 2359 UTC
- Data recording starts: 9 December 2020, 0000 UTC
- Data recording ends: 16 December 2020, 2359 UTC
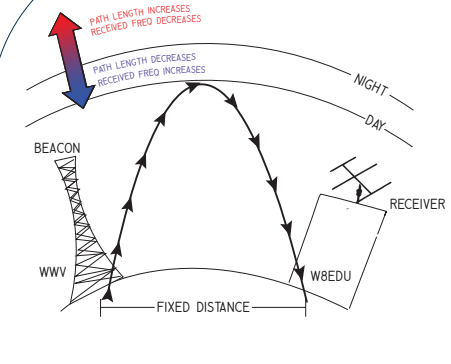
The Beacons
There are multiple time standard stations which can be heard in South America. The Brazilian station PPE (10 MHz) will be the primary beacon for this experiment. You may also pick up signals from the Venezuelan station YVTO (5 MHz), the Argentinian station LOL (10 MHz), WWV, WWVH and BPM. This experiment will use only the 10 MHz transmissions. If you can't get a good signal on 10 MHz, record another frequency and make sure the file is labeled appropriately. The recordings in this experiment are expected to show formations of the D-layer at stations' local sunrise and other daily events of the ionosphere, and the effects of the eclipse. Space weather varies day to day and some features may be prominent. We'll see what we get!
Procedures
1) Sign up on the Interest List
Fill out the survey here to sign up for the email list. You will receive occasional updates and reminders.
2) Prepare Your Receiver
- Tune your radio (in AM mode) to the carrier signal.
- Set your receiver's mode to USB (upper sideband). For a 10 MHz carrier, tune to 9.999 MHz (9999.000 kHz - see image) and listen for the 1000 Hz tone. This is the main thing we'll be looking for when we analyze your data.
- If you have an adjustable filter in your receiver, set it as close to 2.5 kHz as possible.
We will be advising most participants to use an 8kHz sampling rate in the section below. If your radio is relatively new (manufactured after the year 2000 or so) that should be just fine. If you're running an older radio, however, your filters may not have a sharp enough cutoff. (You can see this process in a video here.) To check the filter bandwidth on your receiver:
- Tune your radio (in AM mode) to the carrier signal.
- Set your receiver's mode to USB (upper sideband). For a 10 MHz carrier, tune to 9.999 MHz (9999.000 kHz - see image) and listen for the 1000 Hz tone. Tune down to 9.998 MHz and listen for the higher 2000 Hz tone. Finally, tune down to 9.997 MHz and see if you hear a 3000 Hz tone. If you don't hear a strong carrier signal, you're fine - stick with 8 kHz. If you do hear the tone, you may want to use a higher sampling frequency in Step 5 below. 22050 Hz is a pretty good bet. You can gauge the filesize for different settings here.
3) Prepare Your Computer and Software

- Under Artist Name, put your callsign. (If you are a shortwave listener and not a ham, please use your name or SWL callsign.)
- Under Album Title, put "December 2020 Eclipse."
- Under Year, 2020.
- Under Genre, put your radio model.
- Email Address
- Rig
- Antenna
- Sound Card
- Frequency
- AGC (on or off)
- Latitude (please use decimals, not minutes and seconds!)
- Longitude
- Elevation (m)
- Time zone (Format example: UTC-05:00)
- Grid Square
- Country
IMPORTANT: If you have multiple radios collecting data simultaneously under a single callsign, add a hyphen and station number for each station wherever you would otherwise use the callsign. For example, if station W8EDU is running data collection simultaneously on a Flex radio and an Icom radio, they should label one as W8EDU-1 and the other as W8EDU-2, include a comment in the metadata for each station explaining that the operator ran multiple stations, and make sure that the metadata is correct and complete. This will make it much easier to sort through the data from the experiment during the analysis phase.


- With AGC enabled, set up the radio to produce the 1000 Hz tone in USB mode by tuning the radio 1 kHz below the carrier frequency (e.g., 9.999 MHz for a 10 MHz carrier).
- Set the receiver volume control for a comfortable listening level using the radio’s normal speaker or headphones. It should be loud enough to be above the no-signal receiver noise but not so lout that it causes distortion.
- Set the recording level in Audacity to get approximately 1/4-1/2 full scale recording level, or at the level that leaves about 6 dB to 10 dB of headroom below full scale.
- Turn the receiver AGC OFF.
- Use the RF gain control to set the audio output to the same level as with the AGC ON.
- Make a day-long recording and examine the record. If the levels reached full scale at any time during the recording, reduce the RF gain control and try again. The idea is to have enough RF gain get measurable signal levels even during the weakest part of the day but not so much that the amplitude at the strongest part of the day hits or flattops at full scale.
- Once the RF gain is set it must not be changed while recording eclipse data.
- When submitting your data survey below, make sure to confirm that you performed this procedure.
Once you're all set, your setup should look something like this:
3) Collect the data
The data collection runs from 9 to 16 December. There will also be two practice runs: November 15th and December 5th. During this time, leave your radio running, check it periodically and make sure your computer is not shut down by an automatic update.
We strongly recommend recording a few days' worth of test data before the experiment begins in order to ensure that you don't run into computer problems. After completion but before uploading, select the file/directory to be uploaded, right click on it, and select Send to compressed (zipped) folder. This is what you should upload.
If you would like to include documentation of your station, notes on observations, photos of the experiment or eclipse, etc., please include these in the zipped folder with your data. Unless you note otherwise, we may use your photos, with attribution, in future HamSCI materials.
4) Fill out data collection survey and upload data via Box.
Fill out the data collection survey here. (This is only necessary for the main data run, not the practice runs.)
Upload your at this link: https://cwru.app.box.com/f/d707e6414087462399f3601a2a4e0ca0
You can upload as many files as necessary, but each individual file should not be larger than 15 GB. Compressing your files may help reduce your upload speed. Note that wav files will usually only shrink to about 80% of their original size. You should NOT use mp3 or wma compression, because these formats can compromise amplitude and frequency characteristics.
Frequently Asked Questions
A: Absolutely. Gathering data from widely scattered stations lets us examine ionospheric fluctuations on a range of scales. We're aiming to get stations on every continent.
A: Yes! Get in touch via email if you have questions.
A: Yes! Get in touch via email if you have questions.
A: Yes. Email hamsci@case.edu and we will help you get your radio set up.
A: Yes, but we cannot provide assistance for other programs. We also like Spectrum Lab, though.
A: We've used fldigi's Frequency Analysis mode in past experiments, but we've decided to collect raw data for this one because it will let us collect sideband as well as carrier information.
A: We need to collect control data, ideally from a day with ionospheric conditions that are as similar as possible to the conditions on the day of the eclipse. Collecting a full week of data gives us a few options for that comparison. It also gives us a good look at daily fluctuations.
A: More data is always better, but if you need to take your radio back for part of the event (e.g., to run a traffic net) or experience a data interruption, then we're still interested in your data. Just be sure to stop recording before retuning your radio, tune back to 9.999 MHz before you start it up again when you're ready to resume collecting data, and leave us a note when you submit it.
A: Yes, although we can't guarantee we'll be able to use it.
A: Yes! Email me at kd8oxt@case.edu and I'll mail you a thumb drive.
A: WAV files are limited to 4 GB because the filesize is indicated in the header by a 32-bit unsigned int. Audacity will give you another chance to export. Select "Other uncompressed files," then under "Header," select "WAV(NIST/Sphere)." This will use a different header format, but your data should be the same, and can be uploaded as long as it is less than 32 GB.

A: Yes! Email hamsci@case.edu to discuss further.
A: Of course! Eclipse Festival certificates will be mailed to all participants at the conclusion of the analysis.
Media Mentions
https://www.ce3aa.cl/el-festival-eclipse-de-medicion-de-frecuencia-de-di...
https://cqnewsroom.blogspot.com/2020/11/volunteers-needed-for-propagatio...
https://www.arnewsline.org/news/2020/11/19/amateur-radio-newsline-report...
https://www.spreaker.com/user/hamtalklive/episode-237-q-a-with-rob-sherw...
http://www.arrl.org/contest-update-issues?issue=2020-11-25
https://youtu.be/YX-vTKt1LGk?t=1626
https://www.iaru-r2.org/en/opportunity-to-participate-in-eclipse-propagation-experiment/
https://hackaday.com/2020/11/30/gathering-eclipse-data-via-ham-radio/
Lunchtime Livestream for December 2 - Ham Radio Livestream - YouTube
Acknowledgments
Thanks to Matt KE8NZR for Spanish translation and Noilson Caio - Darkwaves group for Portuguese translation.